Sprinklers irrigate crops, lawns, landscaping, and other greenery. A broken sprinkler can be expensive to repair, but it’s important to have a professional fix it correctly to avoid further damage. For more information visit Harrisburg Lawn Care.
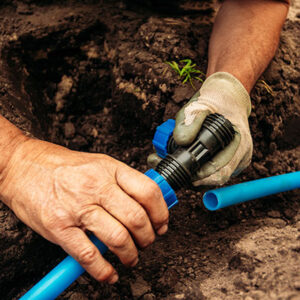
Sprinkler pipes often run underground. A professional will dig up the damaged area, expose the pipe, and replace it.
If a sprinkler valve doesn’t open or close, it is usually because something is stuck inside. This can be as simple as a grain of sand, a small twig, or even an insect. Fortunately, this is a very easy problem to fix, and it’s almost always the first thing you should check. Before you can do anything with a solenoid valve, though, it must be turned off. Turn off each zone’s water valve using the multimeter or remove the wire nuts connecting each one. Once all the valves have been turned off, you can look at each one and see what the problem is.
Almost all solenoid valves have tiny passages, called ports, inside the lid that lead from the bottom of the valve to where the coil was attached. The location of these ports varies by valve brand and model, so it’s important to know how yours is shaped before trying to find them. If these passages are clogged, you’ll need to replace the coil.
Before you do so, however, you should examine the coil closely to be sure it’s not burned out. Burnt coils are usually a sign of incorrect voltage or a short circuit. If you suspect either of these, try changing the coil to one with specifications that closely match your power supply.
Other causes of solenoid malfunction include damage to the seals, gaskets, o-rings, or the valve body itself. If any of these causes a leak, you can often fix it by tightening the fittings, but if the valve body is cracked or broken, you’ll need to replace it.
If a solenoid malfunctions but the coil is still good, the problem is probably with the diaphragm or the ports. These are easily replaced, and the process is fairly straightforward, but it’s recommended that you consult your manual or contact a professional to do it for you. The same is true for any issues with the control wire. Damaged wiring will prevent the controller from “talking” to your valves and making them open or close on time. Wiring can be damaged from normal wear and tear or from tampering critters, and it’s important to examine your entire system for signs of damage regularly.
Control valves have to be chosen and installed correctly for optimum performance. Selecting the right valve for the application and following a plan of regular maintenance, inspections, and repair will help keep them performing well. But, like any equipment, they will eventually wear down or break. This usually results in instability in the control loop. This is most obvious in the form of dead time – the delay between the controller sending a signal to the valve and the valve arriving at its desired position, causing the process level to rise or fall.
Valve stiction or binding is another common issue. This can be caused by the actuator being out of spec, or it could be due to the valve being subjected to frequent vibration and abrasive conditions. Fortunately, this problem can be avoided by visually inspecting and lubricating the diaphragm and piston rings annually and replacing the elastomer trim components and metal seats.
Internal and external valve leaks are also common issues. While no valve can close completely, there are standards for the acceptable amount of allowable leakage. Leaks can occur if the internal components are worn out or if the actuator isn’t set up properly, the positioner isn’t correctly calibrated, or the distributed control system isn’t configured properly.
The most cost-effective solution for control valves is to avoid repair if possible. This can be achieved by implementing preventive maintenance, including testing and documenting the current condition of each valve, ensuring they’re all within their manufacturer’s limits, and using a predictive model to forecast which ones may need to be repaired or replaced. It’s also important to work with a reputable specialist firm that provides experienced technicians, has a solid track record, and offers genuine OEM repair parts. Using a less-reputable partner that uses knock-off parts will save a few dollars during the STO, but these apparent savings can disappear when the plant is put back into service, and problems develop later on. For those cases where it makes sense to repair rather than replace a control valve, leveraging the diagnostic information available in the positioners can be an excellent way to evaluate each valve’s health and determine whether it needs minor instrumentation calibration or an overhaul.
There may be ten or more water valves in a typical home – for sinks, tubs and showers, toilets, washing machines, refrigerator ice makers, dishwashers, outdoor fixtures, and the main gate valve that connects to your water company’s water line. Water valves are important to keep in working order to ensure appliances and fixtures receive water, and the water supply is cut off in case of a flood, burst pipe, or other disaster.
There are some steps you can take to perform minor water valve repairs yourself. This will save you time and money and help prevent further damage to the valve or the pipe it is attached to.
Start by shutting off the water at the leaking valve. Next, remove the valve handle and loosen and detach the packing nut behind it. Then, replace the packing washer and reinstall the valve handle. Tighten the packing nut a few turns at a time, but don’t over-tighten it.
Gate valves are used in waterworks, water treatment, power, pipelines, oil and gas production, and commercial buildings. They can open or close to allow fluid to pass through, isolate areas of the pipeline, or reroute the flow of liquids. They can get damaged when incorrectly calibrated or the valve disc fails to seal properly.
To make a quick repair to a leaking gate valve, you can tighten the packing nut. This nut makes a strong, watertight seal around the stem, which is located in the center of the valve. It would be best if you also cleaned the interior of the valve body and bonnet to remove any solids that could reduce or block the flow of liquids through the valve.
For a more in-depth water valve repair, you can replace the entire valve. To do this, you need to turn off the water supply by closing the valve on the house side and draining the pipes by opening the bleeder valve on the outlet side of the pipeline. You should also use a wire pipe brush and apply flux paste to the inside of the new valve before you slide it over the copper pipe.
If your sprinkler nozzle isn’t spraying or doesn’t pop up when you turn the system on, it’s time to replace it. This is also a good opportunity to upgrade to a more efficient sprinkler head.
Professionals will charge between $50 and $85 to replace a sprinkler head, depending on the hourly rates your landscaper charges for service calls and the costs of parts and labor. But you can save money by repairing yourself.
First, shut off the water to your sprinkler system and dig a hole about 6 inches deep and a foot in diameter around the broken sprinkler head. Then, place the soil you’ve removed in a container so it doesn’t get knocked into your open water line.
Next, find a replacement sprinkler head that fits the specifications of the old one. Check the head’s nozzle and rotation pattern to match your lawn’s needs. Also, make sure that the head’s height is correct. A head that’s too high can be susceptible to damage from weed whackers, mowers, and foot traffic.
Homeowners can easily find the right specs for a new sprinkler head by comparing the old one to the ones available at home improvement stores. If you are still determining whether a replacement will fit, you can bring the old head to the store and consult an experienced salesperson.
Once you’ve found the right sprinkler head, replace the old one with the new one and screw it in place. Shut off the water and test the sprinkler to ensure it’s working properly or to catch any clogs or leaks in the system. If you need more confidence, you can do the job yourself and ask your lawn service to do it. They may be willing to cover the cost of the head if it was damaged during the lawn maintenance service, and they can repair it in about 10 minutes. Be sure to ask about this before you sign a service contract. If you don’t, your bill could increase significantly if the service provider has to dig up and replace multiple broken sprinkler heads over a year.